Monday, April 21, 2014

Don't Be A Ninny. Hire A Planner.

Hey everyone!  Wow this week's been busy!!!  I've had something to do for 27 Dresses every single day.  I blame this on the time of year.  Yes that's right!  We are fast approaching wedding season!!!  AAAHHHH!

In honor of this, I wanted to get the word out there that I will be assisting Michelle at AKM Events with her weddings this season.  Last year, I had the honor of helping where and when I could, but this year it's a little more official as last season I was feeling out the biz and getting an idea of how it all works....I will mostly be day of help, but it may be more depending on her work load and what she needs.  With this, I got to thinking that seeing the work AKM has done for couples is absolutely inspiring.  So inspiring that sometimes I wish I could go back in time and hire Michelle to design for my big day.  Now, don't get me wrong.  In the spiritual sense, there is nothing I would change about our day.  That was all great!

I had a handsome man...


Who was excited to marry me.


And he even loved my son.  :)


We had a great ceremony.


(Look at those flowers...thanks Lake Effect Florals!)
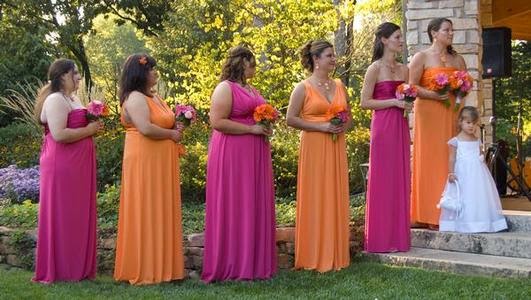


And we were surrounded by people we loved, and who loved us.


So yes, spiritually/ceremony....great!  But then it's party time.  And let's face it, in the realm of your wedding day, the ceremony is a blink of an eye.  Then you move the guests to the reception site and 
that's where you spend hours and that's where most of the time and money that you've taken months 
to plan and earn goes to.  If I could change anything about my wedding day, it would be to make the after party match the awesome ceremony.  Maybe that's what Johnsie was thinking about here.  ("Uh yeah...Now we have to go from this beauty to plastic cups and paper napkins.")  Yikes.


Again, we had fun.  Johnsie and I have families that LOVE to dance.


And friends who are always the life of the party.  

(That is the Japanese hand symbol for life of the party.)


BUT...  Here's the reality...Our tables were bare.  At the last minute, my sister went out and got bud vases that we bought a few extra flowers to go in and also used the bridesmaid bouquets for extra table flair.  But again, it doesn't match the real beauty of the day.

We had plain white table cloths and office looking chairs.  Which not only didn't match the day either, but it didn't show who Johnsie and I even were!  Our wedding party was decked out in bright pink and orange for goodness sakes!  We are colorful people!  It would've been so nice for the room to reflect that.


So yeah...we had that...and could've had this...


Even our awesome cake was just laying there on a white table cloth.  Now I know Michelle, and she would've made it a display somehow... someway.  It would've been raised with color underneath and flowers on the sides.  Something amazing.  I know this.  And that's how it should've been.  It was a special cake.  But instead it was in the back in a dark corner.  I still have guests that are like..."There was a cake?"  
Errrr!


  None of this is the end of the world I understand, but knowing now that I could've treated our guests to something more makes me a little regretful.  And the reason this happened (And I guess the point to all this) was because I had no idea it could be any different with the budget I was working with!  Michelle has the hook up people!  She can get you so much closer to what you want with the budget you have than you could ever get yourself.  And on top of all that...by the end of planning everything by ourselves...we were exhausted which caused us to go over budget anyway!  I could've given that money to a planner and had something spectacular, but instead we were so tired of thinking about things and making things ourselves that by the end, we were just throwing this and that on our credit cards thinking..."It will work itself out."

Well work itself out translated to high monthly credit card payments we couldn't afford.  Awesome way to start a marriage.  lol!  Good thing I picked a keeper.  He has stood behind me and supported me no matter what.  :)


In all seriousness, I just really want to get the word out there and be honest because I wish I knew then what I know now.  And if your budget just can't stretch for full time design and organization help, AKM also has smaller packages and even day of packages that can make things nice and smooth for the actual wedding day.  Might be a nice choice for those brides who have maid of honors gone bad that I see on all these wedding reality shows lately.  haha!

Anyhoo,  Check it out!  You won't be disappointed...and I'll be there too!  :)

Now stop being a ninny and hire a planner! 


219-512-5620


Thursday, April 10, 2014

This Organizing Stuff Is For The Birds...Or Is It?

I hate organizing.  The thing is though, I don't get anything done when I'm unorganized.  So this past week, I took the bull by the horns and decided to get my "studio" looking more like one.  The first thing I did was put a small Pinterest board together.  I found this picture and decided it would be my inspiration.


To be quite frank, I wanted to get something for nothing.  And...mission accomplished.  I spent $45 on some sheets, organizing bins, and the rest I had lying around and was ready to re-use it.  I should be honest and tell you though...In order to keep costs down, it required ALOT of work...  Here's some proof.


Yeah.

One of the things I did was makeover an old folding chair.  I don't know about you, but I find the cushioned folding chairs quite comfy.  This is how it turned out.


I really liked how the satin looked when I was finished.

I also made some shelves with old boards I painted in black and hung with ribbon.  Another Pinterest idea.


See them hanging over my little seating area?  And the seating was a couple of fillable box/ottomans I used to have in my living room before I re did it, and a couple of travel pillows I covered with the leftover satin.


My desk I work on actually was raw wood (but I forgot to snap a pic before I started painting).  It was a hand me down from an old friend...I shabby chic'd it (well my hubby helped with that part), and I love how it turned out.


Then I made a little corner changing nook by hanging some hooks and hanging an old curtain rod from them with ribbon.  The curtains again were from my old living room design.  :)


I also put another area with a desk so I can sketch and print invoices too.  Does the desk look familiar?  It was in the "gypsy chic" photo shoot Michelle and I did that was featured in Landlocked bride.  It actually used to belong to Marshall Field.  My great aunt and uncle bought one of his old homes in Chicago and he left it in the house.  It's been passed through my family and now it's my turn to have it.  :)  Pretty cool huh?


Anyhoo...Here's how it all turned out...


I think it's lovely don't you?  It's nice and bright and there is a place for everything.  Makes working so much more enjoyable!  Hope it inspires all of you to do some spring revamping...

Feel free to share any makeovers you are doing this spring.  I would love to see them!

XO, Christina


Tuesday, March 25, 2014

A Hidden Jewel And A New Display

So for those of you who aren't aware, I have a small display up at Lake Effect Florals in Chesterton.  This is courtesy of the lovely Miss Audrey Drag.  Here's my sneaky picture of her...


       Then I made her laugh...sorry for the blur...She still looks lovely!


I stopped in this weekend to change the display from winter to spring and add a few more items to the table.  It's been a nice feeling to have a place with a bit of traffic for my work to be seen locally.  Also it has been so nice talking with Audrey and seeing her adorable shop a little more regularly. I wanted to share a little of it with you...


This is a shelf she has up with pots, artwork, children's books, coasters...Great heartfelt gifts from local artists for sale.  I love that she supports so many people in the community!!!


This week she has air plants and succulents for sale for $3 each!  They are all so different and absolutely gorgeous!


I had to buy some!  :)  She gave me a quick lesson on watering and sunlight and now they are chillin' in my window at home!  Aren't they so cute?  


Audrey will also be a part of the upcoming English Tea bridal shoot I blogged a bit about in my last post!  Be sure to stay tuned for  that post...It will probably at the end of April.

As for my display table...I think she's looking pretty good.  :)  I added a little pink into the mix.  (My favorite color in case you are wondering), and a nice framed sign that I'd made for my Indie Wed booth.  I also brought a few more heads and was able to add a few more free pieces to the mix since I don't have any more shows coming up any time soon.


I think that's about all I have to report in.  Now it's time to head on over and check it all out if you are interested or know someone who is.  Also, see what else this little jewel of a shop has to offer...Let Audrey make you something lovely.  Her work is impeccable...I can promise you that.

XO,
Christina


Tuesday, March 18, 2014

That's Sketchy

Hello everyone!  It is I, your awesome (blog slacking) local designer.  :)

So I am a week behind schedule (again) with my blogging.  Sorry about that!  I originally planned to blog last week about my friend Audrey's floral shop, and my awesome display she has so graciously let me steal some space from her for.  However, we had to reschedule to meet this coming Saturday so that will be my post for next week I think.  Be sure to tune in for that.  ;)

As for now, I thought I would share something I'm very mediocre at with you.  lol!...  Sketches!
This is a step I admittedly have to say I skip in more cases than not.  Being a mom and starting your own company (no matter what it is) leaves you strapped for time... So many times I just have a vision in my head and that's what I work from.

If you follow me on Instagram, you've seen that lately though, I've been lucky enough to be included on a few big projects and I thought it was time to bring back this step, so I could have clear vision and keep my ideas organized.  Not only has it worked for that, but it also made me realize how much I really do enjoy getting my ideas out before jumping right into a design.

The first project I have coming up is an English Tea inspired bridal shoot.  My vision for the bride is a short 2 piece lace and chiffon get up, with snow angel sleeves, a scalloped bottom, and (of course) an over the top mini hat.


I thought the bridesmaids should definitely be in a floral print and I would add some ruffles, a sash, and again...huge headpieces.  I have to admit, the headpieces are probably what I am most excited about!


Shortly after that, I will be doing the wardrobe for a skateboarder themed bridal shoot.  My bestie Michelle is the creative mind behind these designs, so I can't take full credit, but I think I have done a decent job at bringing her ideas to life.  We are doing our bride in a blush gown with a high low hem and ruffled tulle accents.  I'm adding black lace boot cuffs to soften the masculine boots, and I'm thinking an edgy headband, but it will depend on her hairstyle in the end.


And the bridesmaids will be in lace topped black tulle short dresses with blush petticoats and floral hairclips.


Another upcoming project will be for a sweet couple's wedding.  :)  Congrats Scott and Colleen!!!  Colleen showed me a beautiful dress she liked online, so I went home and redesigned it.  lol!  In my defense, though...there were a few things Colleen didn't like about the dress she saw online.  There were slits in weird places, and better colors in her head than plain white.  So she decided to go with champagne lace and we will embellish with beautiful beaded appliques.


The back will have a rounded scalloped edge and a see through lace back with buttons running down the middle.


She will look absolutely stunning!

Now it's time to bring all of these visions to life.  I'm literally praying I do justice to it all.  
Thanks to everyone who has entrusted me to be a part of these important projects.  I'm very humbled by all of it.

Xo,
Christina

Friday, February 28, 2014

Girlie Hair Bow Tutorial

A few months ago my friend Missy of Mel Klemz Photography did a photo shoot for our mutual friend Crystal's kids.  The pictures turned out so beautiful, and I noticed Crystal's daughter Addy looked so cute in her flower hair clip.  It made me want to make one for her too, so I commented on one of the photos letting Crystal know that. :)  Not much time went by before she took me up on it and put me to work.  She wanted me to design some first grade themed bows.  I was all over it!  It took a minute to get the supplies just right, but I finally did and I made some amazingly cute bows...if I do say so myself!  

I just knew in my mind they were going to be great, so I decided to record the process and share it with everyone for my FIRST EVER TUTORIAL!!!  I hope you enjoy it, and you mom's with little girls out there get inspired and make your little cutie some hair accessories from the heart!  <3 p="">

Ok...let's get started.  First the supplies are as follows:
*Hot glue gun
*6 ribbon strips (For this larger bow I made them 17" long)
*Scissors
*Felt
*Hand sewing needle
*Thread
*Fray Check (available at any craft store)
*Button
*Alligator clip


First cut the ends of all the ribbon strips to look like this...


Then fray check the ends, so they don't um....fray.  :)


Next you will put a dot of glue about mid ribbon and fold over the side to start your bow.  Then repeat this for the other side.


Then do this to all 6 strips of ribbon.


Then put a dot of glue in the middle of one of the "like" bows and stack it's match on top so they look like this.


Then you will stack the stacks so to speak and glue them on each other forming a flower like shape...like this!


 Now it's time to use your button.  I have bags of vintage buttons, so I just dug through and found a large black button.  To give it a sewn feel I threaded it just like you would if you were sewing it to a garment.  I used hot pink thread to add some flair.


When you are done sewing, knot off the end and cut the thread.  Then you will cut a little circle of felt just a tad smaller than the button.  Put glue on the felt and attach it to the back of the button.


From there you will then glue the felt that is now attached to the back of the button and  add it to the center of the "flower."


Alright, hang in there!  We are on the home stretch... Cut 2 pieces of felt.  A larger piece for the back of your bow (This helps give the bow the support it needs and tones down some of the floppiness), and a smaller piece that will be a support for your alligator clip.


Glue the larger piece to the back of your bow.


Now glue the top of the alligator clip and attach it upside down to the felt.


Next glue the smaller piece, open the clip, insert and press down giving that extra support so you can be sure the clip isn't going anywhere.


And you are done!  An awesome bow awaits your little cuties locks!  Maybe Crystal will send me a picture of Addy in her new bow when she picks up so I can update you all...Hint hint Crystal.  :)


I also made a smaller one just to give little Addy some variety!  


I hope you enjoyed my tutorial!  I would love to see what you all come up with by following this, so feel free to share!